What Is Embroidery Digitizing? A Complete Beginner’s Guide
What Is Embroidery Digitizing? A Complete Beginner’s Guide
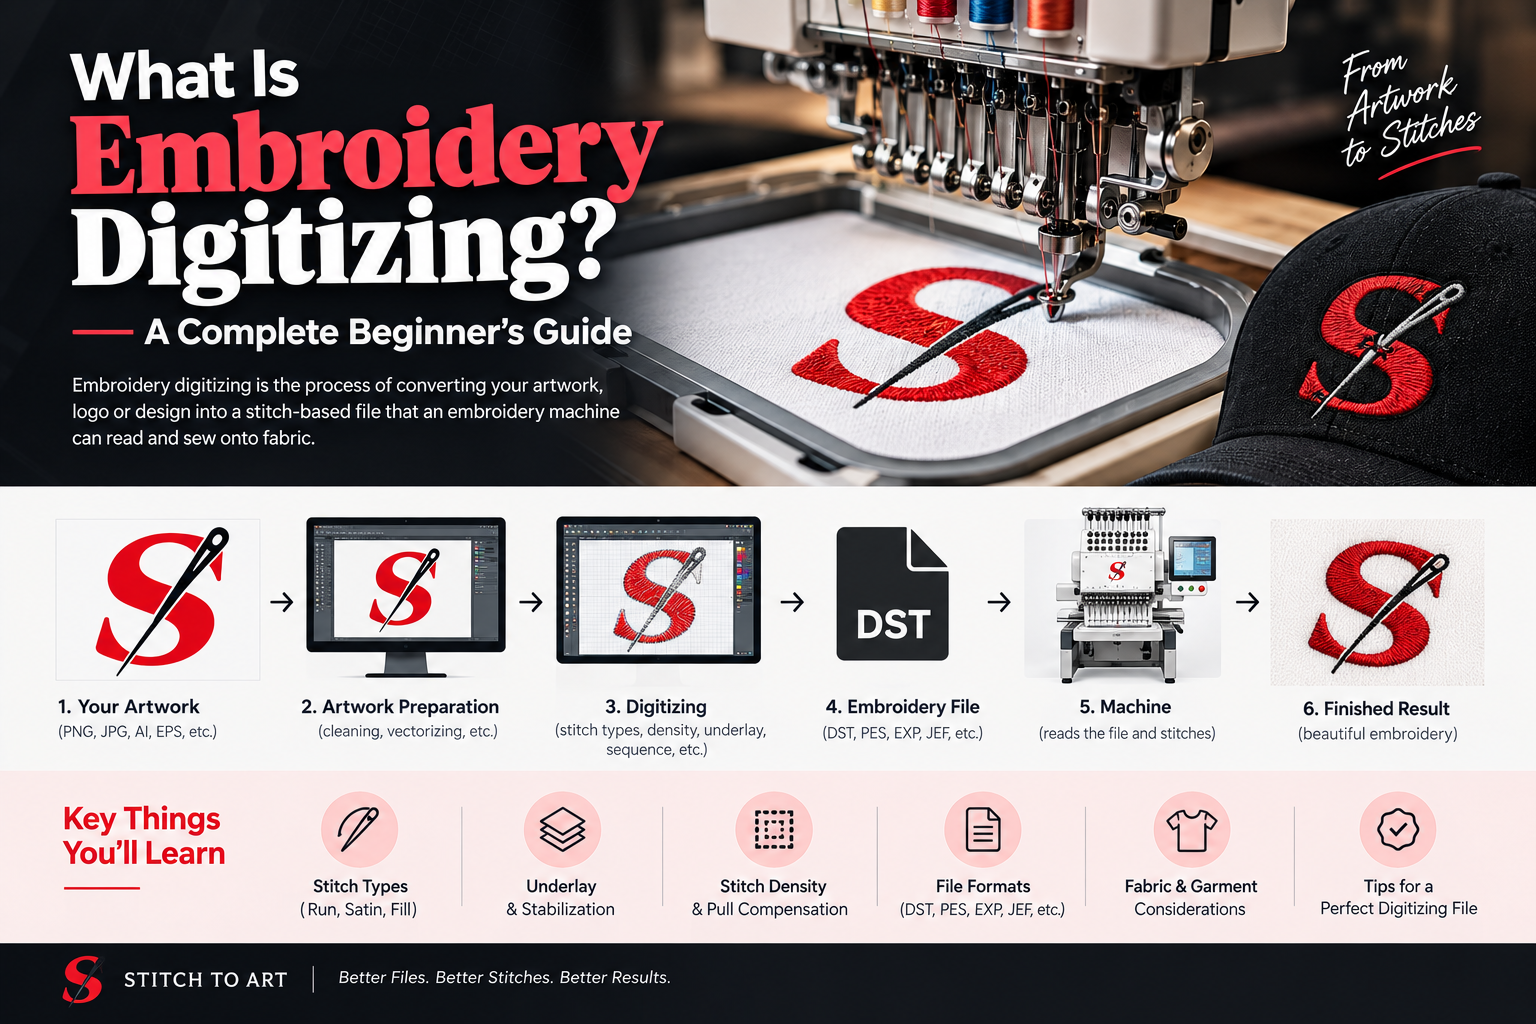
Embroidery digitizing is the process of converting artwork, logos, text, or graphics into a stitch-based file that an embroidery machine can read and sew onto fabric.
If you’ve ever wondered why you can’t simply upload a PNG or JPG directly into an embroidery machine, this is the reason: embroidery machines don’t understand pixels or normal graphic shapes. They understand stitches, stitch directions, thread colors, needle changes, and machine movements.
A good digitized file tells the machine exactly what to stitch, where to stitch it, how densely to stitch it, and in what order.
In this beginner’s guide, we’ll break down embroidery digitizing from start to finish—including stitch types, underlay, density, pull compensation, file formats, artwork preparation, and what makes a production-ready embroidery file.
What Is Embroidery Digitizing?
Embroidery digitizing is the process of translating a digital design into a series of instructions that an embroidery machine can follow.
For example, imagine you have a company logo in PNG format:
PNG Logo → Digitizing → Embroidery File → Machine → Finished Embroidery
The digitizer analyzes the artwork and decides:
- Which areas should be filled
- Which areas should use satin stitches
- Where outlines should go
- What stitch direction each section needs
- How much stitch density is required
- What underlay should be used
- Where the machine should start and stop
- When the needle should change colors
- How the design should compensate for fabric movement
- What machine format needs to be exported
So digitizing isn’t simply “converting an image into stitches.”
It’s closer to rebuilding the artwork specifically for embroidery.
Why Can’t You Just Use a PNG or JPG?
PNG, JPG, and other normal image formats contain pixels.
An embroidery machine doesn’t know what to do with those pixels.
For example, a JPG might tell your computer:
“This area is red.”
But the embroidery machine needs much more information:
“Use red thread, start stitching here, follow this direction, use this stitch type, maintain this density, then move to the next section.”
That’s why artwork needs to be digitized before it can become a usable embroidery design.
A simple comparison
| Graphic File | Embroidery File |
|---|---|
| Pixels / shapes | Stitch instructions |
| Designed for screens/printing | Designed for embroidery machines |
| PNG, JPG, SVG, AI, EPS | DST, PES, EXP, JEF, VP3, etc. |
| Doesn’t contain stitch sequence | Contains stitch sequence |
| No needle movement | Contains machine movements |
How Does Embroidery Digitizing Work?
A professional digitizing workflow usually looks something like this:
1. Artwork Preparation
The original artwork is examined and cleaned.
The digitizer may need to:
- Remove unnecessary details
- Fix broken artwork
- Recreate missing shapes
- Convert raster artwork into clean vector artwork
- Simplify tiny elements
- Separate colors
- Adjust text
- Identify areas that can actually be embroidered
This stage is extremely important because not every part of a graphic can be reproduced exactly in thread.
2. Determine the Final Embroidery Size
The final size affects almost every digitizing decision.
A logo that looks great at 8 inches wide may become unreadable at 2 inches wide.
For example, small text, thin outlines, tiny gaps, and detailed artwork may need to be simplified when the design is reduced.
That’s why professional digitizing isn’t simply:
“Make the artwork smaller.”
Instead, the design may need to be redigitized specifically for the new size.
3. Choose the Right Stitch Types
Different parts of a design require different stitch types.
The three basic stitch categories beginners should understand are:
Run Stitch
A run stitch is commonly used for:
- Fine outlines
- Small details
- Thin lines
- Lettering
- Borders
It works well where a narrow stitched line is required.
Satin Stitch
Satin stitches create smooth, dense embroidered areas.
They’re commonly used for:
- Borders
- Lettering
- Outlines
- Narrow columns
- Logos
Satin stitch is especially useful when you want a smooth, clean finish.
Fill Stitch
Fill stitches cover larger areas with rows of stitches.
They’re commonly used for:
- Large shapes
- Background areas
- Filled logos
- Large artwork sections
A design may use all three stitch types together.
What Is Underlay in Embroidery?
Underlay is stitching placed underneath the visible top stitches.
Think of it as the foundation of the embroidery.
Underlay can help:
- Stabilize the fabric
- Support the top stitches
- Improve coverage
- Reduce fabric show-through
- Define the embroidery area
- Improve the overall appearance
Different fabrics and designs may require different underlay strategies.
For example, a design on a stable twill fabric won’t necessarily require the same setup as a design on a stretchy polo shirt.
What Is Stitch Density?
Stitch density refers to how closely stitches are placed together within an embroidered area.
Too little density can result in:
- Poor coverage
- Visible fabric
- Weak-looking embroidery
- Uneven areas
Too much density can result in:
- Excessive stitches
- Thread buildup
- Stiff embroidery
- Fabric distortion
- Longer production times
The goal isn’t simply to use more stitches.
The goal is to use the right amount of stitches for the design and fabric.
This is one of the reasons a good embroidery file can sometimes have a surprisingly lower stitch count than a poorly digitized version while still producing a better result.
What Is Pull Compensation?
During embroidery, fabric can move or distort slightly as stitches are sewn.
This is known as pull.
Pull compensation is a digitizing technique used to account for this movement.
Without appropriate compensation, certain shapes can become:
- Narrower than intended
- Misshapen
- Misaligned
- Separated from nearby elements
A skilled digitizer considers how the fabric and stitch structure will behave during production rather than designing only for what looks correct on a computer screen.
Why Stitch Sequence Matters
The order in which elements are embroidered matters.
A professional digitizer plans the sequence to help control:
- Registration
- Fabric movement
- Jump stitches
- Color changes
- Thread trims
- Stitch direction
- Overall efficiency
For example, randomly stitching every element in the order it appears in the artwork can create unnecessary movement and poor registration.
A well-planned sequence helps the machine work more efficiently while producing a cleaner result.
Why Fabric Matters
One embroidery file does not necessarily work perfectly on every fabric.
The same logo may behave differently on:
- Cotton
- Denim
- Twill
- Polo fabric
- Fleece
- Towels
- Caps
- Jackets
- Stretch fabrics
- Performance fabrics
A stretchy garment may require a different approach from a structured cap or dense twill jacket.
This is why professional digitizing considers the final application, not just the artwork.
Cap Embroidery vs Flat Embroidery
This is another important concept for beginners.
A design embroidered on a flat garment and the same design embroidered on a curved cap can require different digitizing considerations.
Caps introduce challenges such as:
- Curved surfaces
- Different stitch directions
- Center seams
- Limited design areas
- Registration issues
- Increased distortion
So if a customer says:
“I already have this logo digitized for a shirt. Can you use the same file on a cap?”
The answer isn’t always simply yes.
Sometimes the design needs to be adjusted or redigitized for the cap.
What Are Common Embroidery File Formats?
Once a design has been digitized, it needs to be exported into a format compatible with the embroidery machine.
Some commonly encountered formats include:
| Format | Common Association |
|---|---|
| DST | Tajima and widely supported commercial machines |
| PES | Brother / Baby Lock |
| EXP | Melco and some other systems |
| JEF | Janome |
| VP3 | Husqvarna Viking |
| HUS | Older Husqvarna systems |
| XXX | Singer-related systems |
The exact format required depends on the machine.
Important: File extensions should not be treated as interchangeable just by renaming them. The embroidery data itself needs to be properly exported for the intended machine format.
What Is the Difference Between Digitizing and Vector Conversion?
These two services are often confused.
Vector Conversion
Vector conversion turns raster artwork such as PNG or JPG into scalable vector artwork.
Common vector formats include:
- AI
- EPS
- SVG
Embroidery Digitizing
Embroidery digitizing converts artwork into machine-readable stitch data.
Common embroidery formats include:
- DST
- PES
- EXP
- JEF
- VP3
The workflow can therefore look like:
PNG → Vector Artwork → Embroidery Digitizing → DST/PES/etc.
However, a vector file is not automatically an embroidery file.
Can Every Logo Be Digitized?
Technically, almost any artwork can be interpreted for embroidery—but that doesn’t mean every detail can be reproduced exactly.
Very small details can be difficult.
Common problem areas include:
- Tiny text
- Extremely thin lines
- Small gaps
- Complex gradients
- Photographic details
- Very small shapes
- Excessively detailed illustrations
A professional digitizer may need to simplify the artwork while preserving its recognizable appearance.
Example
Imagine a logo contains text that is only 2 mm tall.
On a computer monitor, it might look perfectly readable.
In embroidery, that same text could become too small for reliable stitching.
The solution may be to:
- Increase the text size
- Simplify the letters
- Increase spacing
- Change the font
- Remove unnecessary details
Good digitizing is often about knowing what to preserve and what to simplify.
What Makes a Good Embroidery File?
A production-ready embroidery file should generally have:
✅ Appropriate stitch types
✅ Correct stitch density
✅ Suitable underlay
✅ Proper stitch direction
✅ Logical stitch sequence
✅ Appropriate pull compensation
✅ Clean trims and jumps
✅ Correct color sequence
✅ Suitable sizing
✅ Machine-compatible format
✅ Consideration for the target fabric
✅ Testing or sew-out when necessary
The goal isn’t to create the file with the highest stitch count.
The goal is to create a file that sews cleanly and produces the intended result.
What Happens When an Embroidery File Is Poorly Digitized?
A poorly prepared file can cause problems such as:
- Thread breaks
- Bird nesting
- Uneven coverage
- Distorted shapes
- Poor registration
- Excessive stitch counts
- Excessive thread changes
- Unnecessary trims
- Small text becoming unreadable
- Fabric puckering
- Collapsed satin columns
- Poor-looking sew-outs
And there’s another hidden cost:
Production time.
A bad file can cause machine downtime, wasted garments, wasted thread, and additional operator work.
That’s why the cheapest digitizing file isn’t necessarily the cheapest option overall.
Why Sew-Out Testing Matters
A design can look perfect inside digitizing software and still behave differently when stitched.
That’s because software doesn’t perfectly reproduce:
- Fabric behavior
- Thread tension
- Needle penetration
- Stabilizer performance
- Garment movement
- Actual stitch texture
A sew-out test allows the digitizer to evaluate the real result.
Depending on the design, adjustments may then be made to:
- Density
- Underlay
- Stitch direction
- Compensation
- Sequence
- Lettering
- Overall sizing
For production work, testing can be especially valuable for complex logos, small lettering, unusual fabrics, and high-value garments.
How to Prepare Your Logo for Digitizing
If you’re sending artwork to a digitizer, provide the best source file available.
Ideally provide:
1. Vector artwork
AI, EPS, SVG, or PDF can be very useful.
2. High-resolution raster artwork
If vector artwork isn’t available, provide the highest-quality PNG/JPG you have.
3. Exact embroidery size
Tell the digitizer the intended dimensions.
For example:
3.5 inches wide × 2.5 inches high
4. Target garment
Mention whether it’s going on:
- Polo
- T-shirt
- Cap
- Jacket
- Hoodie
- Tote bag
- Patch
- Towel
5. Machine format
Tell the digitizer which machine or file format you need.
6. Thread colors
If exact brand/thread colors matter, provide the thread brand and color references when possible.
Embroidery Digitizing: A Simple Example
Let’s say a customer has this logo:
Company logo → 3.5-inch left chest embroidery
The workflow could look like this:
Step 1
Clean the original artwork.
Step 2
Determine the final 3.5-inch size.
Step 3
Separate the logo into embroidery objects.
Step 4
Assign appropriate stitch types.
Step 5
Set stitch density and underlay.
Step 6
Apply appropriate pull compensation.
Step 7
Create an efficient stitch sequence.
Step 8
Add trims, jumps, and color changes.
Step 9
Simulate and inspect the file.
Step 10
Export the required machine format.
Step 11
Run a sew-out when appropriate.
Step 12
Make adjustments based on the physical result.
That’s the difference between turning artwork into stitches and actually preparing artwork for embroidery production.
Frequently Asked Questions
Is embroidery digitizing the same as converting a PNG to DST?
No. A PNG is an image containing pixels, while a DST is embroidery machine data containing stitch instructions. Proper digitizing requires decisions about stitch types, sequence, density, underlay, compensation, and more.
How long does embroidery digitizing take?
It depends on the design complexity, size, stitch count, lettering, number of colors, and required application. A simple logo can be much quicker than a highly detailed jacket-back design.
Does a higher stitch count mean better embroidery?
Not necessarily. Excessive stitches can increase production time and may create unnecessary thread buildup or fabric distortion. Good digitizing uses an appropriate stitch structure for the design.
Can I use the same embroidery file on every garment?
Not always. Different fabrics, garment types, sizes, and applications can require adjustments or different digitizing approaches.
What file should I send to my digitizer?
A clean vector file is often ideal, but a high-resolution PNG or JPG can also be used. Include the intended size, garment type, and any important color requirements.
What is the most common embroidery file format?
DST is one of the most widely encountered embroidery machine formats, particularly in commercial embroidery. However, the correct format depends on the specific machine.
Final Thoughts
Embroidery digitizing sits between graphic design and physical manufacturing.
A logo that looks perfect on a screen still has to work with:
fabric + needle + thread + stabilizer + machine + stitch structure.
That’s why professional digitizing isn’t simply an automatic conversion from an image into a machine file.
It’s the process of making design decisions that allow artwork to translate successfully into thread.
If you’re preparing artwork for embroidery, start with clean artwork, define the final size and garment, choose the correct machine format, and test complex designs before full production.
A good embroidery file isn’t the one that simply opens on the machine—it’s the one that sews cleanly and produces the result the artwork was intended to achieve.
The newsletter
Stay Updated With
Industry Insights.
Get the latest embroidery tips, vector design techniques, production advice, and business resources delivered directly to your inbox. One useful email — no spam, ever.
Unsubscribe anytime. We respect your inbox and your data.